We can purge below log files after stopping all the Oracle Application server services,
%ORACLE_HOME%\Apache\Apache\logs
%ORACLE_HOME%\opmn\logs
%ORACLE_HOME%\dcm\logs
%ORACLE_HOME%\sysman\logs
%ORACLE_HOME%\j2ee\ [ OC4J instance name ]\log
%ORACLE_HOME%\j2ee\ [ oc4j instance name ]\application-deployments\ [ application name ] \[ oc4j instance name ]_default_island_1\*
Tuesday, August 30, 2011
Tuesday, June 29, 2010
Oracle Magazine July/August 2010
Oracle Magazine for July/August 2010 available at the below link
http://www.oraclemagazine-digital.com/oraclemagazine/20100708?sub_id=oW7rAkMPiAA4#pg2
http://www.oraclemagazine-digital.com/oraclemagazine/20100708?sub_id=oW7rAkMPiAA4#pg2
Monday, May 31, 2010
Change Negative (-) Value to Positive (+) Value in Oracle
Description:
We can use the below method to change the records into Negative to Positive.
Solution:
SQL>create table tmp (col1 number)
SQL>SET DEFINE OFF;
SQL>Insert into TMP(COL1) Values(-1);
SQL>Insert into TMP(COL1)Values(-2);
SQL>Insert into TMP(COL1) Values(-20);
SQL>Insert into TMP(COL1)Values(300);
SQL>COMMIT;
SQL>select col1,case when sign(col1)=-1 then '('||(col1)*(-1)||')' else to_char(col1) end col1 from tmp;
Connection to sys /as sysdba hangs
Description:
When I try to connect database using sys /as sysdba database hangs. No response from the database. I tried the below method to solve this issue.
Solution:
Step 1: Tried sqlplus connect " / as sysdba", found that Database hangs.
Step 2: While this connection hangs, opened a different session, issued the following command to find the Oracle related process.
$ps -ef | grep ORACLE_SID
Step 3: Killed the below the Oracle related process using th below command.
kill -9 pid of processess that are connected that are not related to the sysdba connection (pid from Step 2)
Step 4: Now successfully logged into sys/as sysdba session returns SQL prompt, and issued the following
SQL> shutdown abort
SQL> startup restrict
SQL> shutdown immediate
SQL> startup
Step 5: Checkd the database connections as sysdba are successful
$sqlplus "/as sysdba"
SQL> connect / as sysdba
Application Server Log File Details
Application Server Control Console:
ORACLE_HOME/j2ee/home/log/ascontrol.log
ORACLE_HOME/j2ee/home/log/home_default_group-1/
Content DB (Node Log):
ORACLE_HOME/content/log/domain_namenode_name.log
Content DB (Application Logs):
ORACLE_HOME/j2ee/OC4J_Content/application-deployments/Content/OC4J_Content_default_group_1/application.log
HTTP Server:
ORACLE_HOME/Apache/Apache/logs/error_log.log
OC4J instance_name:
ORACLE_HOME/j2ee/instance_name/log/instance_group_process/
ORACLE_HOME/j2ee/instance_name/application-deployments/application_name/application.log
OC4J instance_name:
ORACLE_HOME/j2ee/instance_name/log/instance_group_process/oc4j/log.xml
OPMN:
ORACLE_HOME/opmn/logs
ORACLE_HOME/opmn/logs/component_type~
Port Tunneling:
ORACLE_HOME/iaspt/logs
Universal Installer:
ORACLE_HOME/cfgtoollogs
WebCenter (Application Logs):
ORACLE_HOME/j2ee/OC4J_WebCenter/application-deployments/type/OC4J_WebCenter_default_group_1/application.log
Tuesday, May 25, 2010
How do I check Oracle Application Server Version details?
We can use the below files to find Oracle Application Server versions details
ORACLE_HOME\config\ias.properties
ORACLE_HOME\install\readme.txt
ORACLE_HOME\install\setupinfo.txt
C:\Program Files\Oracle\Inventory\logs\installActions_installed_date
ORACLE_HOME\config\ias.properties
ORACLE_HOME\install\readme.txt
ORACLE_HOME\install\setupinfo.txt
C:\Program Files\Oracle\Inventory\logs\installActions_installed_date
Wednesday, April 28, 2010
Auditing Login/Logout Session information
Description:
Below method can be used to store Session Login and Logout Information. It stores in to a table.
Step 1: Create UserLogAudit Table using the below script
CREATE TABLE UserLogAudit
(
UserId VARCHAR2(30)
, SessionId NUMBER(8)
, HostName VARCHAR2(30)
, LogonDay DATE
, LogonTime VARCHAR2(10)
, LogoffDay DATE
, LogoffTime VARCHAR2(10)
, ElapsedMinutes Number(8)
, Updated DATE
, UpdatedBy VARCHAR2(50)
);
Step 2: Create Logon Trigger to get Logon Information
CREATE OR REPLACE TRIGGER LogonAuditTrigger AFTER LOGON ON DATABASE
BEGIN
INSERT INTO USERLOGAUDIT VALUES (User
, Sys_Context('USERENV','SESSIONID')
, Sys_Context('USERENV','HOST')
, Sysdate
, to_char(Sysdate, 'hh24:mi:ss')
, null
, null
, null
);
END;
Step 3: Create Logoff Trigger to get Logoff Information
CREATE OR REPLACE TRIGGER LogoffAuditTrigger BEFORE LOGOFF ON DATABASE
BEGIN
-- UPDATE the logoff day
UPDATE USERLOGAUDIT
SET LogoffDay = sysdate
WHERE Sys_Context('USERENV','SESSIONID') = SessionId;
-- UPDATE the logoff time
UPDATE USERLOGAUDIT
SET LogoffTime = to_char(sysdate, 'hh24:mi:ss')
WHERE Sys_Context('USERENV','SESSIONID') = SessionId;
-- Compute the elapsed minutes
UPDATE USERLOGAUDIT
SET ElapsedMinutes = ROUND((LogoffDay - LogonDay)*1440)
WHERE Sys_Context('USERENV','SESSIONID') = SessionId;
END;
Thursday, April 22, 2010
Oracle Magazine May/June 2010
Oracle Magazine for May/June 2010 available at the below link
http://www.oraclemagazine-digital.com/oraclemagazine/20100506?sub_id=oW7rAkMPiAA4#pg2
http://www.oraclemagazine-digital.com/oraclemagazine/20100506?sub_id=oW7rAkMPiAA4#pg2
Wednesday, March 3, 2010
How do I Extract tar file?
We can use the below command to extract .tar file:
tar -xvf filename
We can use the below command to unzip the .gz file:
/usr/local/bin/gunzip -d filename
tar -xvf filename
We can use the below command to unzip the .gz file:
/usr/local/bin/gunzip -d filename
Monday, March 1, 2010
Script to Submit Oracle Job on Every Sunday
Description:
I used the below script to Schedule the job the Every Sunday 3 AM.
Script:
#### Script Starts Here ####
VARIABLE jobno NUMBER;
BEGIN
DBMS_JOB.SUBMIT(:jobno, 'SCHEMANAME.PACKAGENAME.PROCEDURENAME;', TRUNC(NEXT_DAY(SYSDATE,'SUNDAY'))+3/24,'TRUNC(NEXT_DAY(SYSDATE,''SUNDAY''))+3/24 ');
COMMIT;
END;
/
#### Script Ends Here ####
Thursday, February 25, 2010
13761: Current form cannot be executed without current profile context (Oracle Clinical)
Description:
Below error occurs while accessing, Oracle Clinical
Maintain Discrepancy Database for a Study screen.
13761: Current form cannot be executed without current profile context.
Solution:
Lack of "RXC_DMGR" role the above error occurrs. Grant RXC_DMGR role to the user solves the issue.
Step 1: Login as SYS
Step 2: GRANT RXC_DMGR TO OPS$USERNAME;
Script to Delete Trace Files
Description:
Below script can be used to delete trace files older than 15 days.
Script:
#/usr/bin/sh!
TRACE_TOKEEP=15
TDUMP_DIR=
find $TDUMP_DIR -name "*.trc" -mtime +$TRACE_TOKEEP -exec rm -f {} \;
Below script can be used to delete trace files older than 15 days.
Script:
#/usr/bin/sh!
TRACE_TOKEEP=15
TDUMP_DIR=
find $TDUMP_DIR -name "*.trc" -mtime +$TRACE_TOKEEP -exec rm -f {} \;
Tuesday, February 23, 2010
ORA-01950: no privileges on tablespace 'USERS'
Description:
User faced ORA-01950: no privileges on tablespace 'USERS' error.
Solution:
I granted below privilege to the user to avoid ORA-1950 Error.
ALTER USER USERNAME QUOTA UNLIMITED ON USERS;
User faced ORA-01950: no privileges on tablespace 'USERS' error.
Solution:
I granted below privilege to the user to avoid ORA-1950 Error.
ALTER USER USERNAME QUOTA UNLIMITED ON USERS;
Friday, February 19, 2010
How to change Archive Log Destination
Description:
I used below steps to change Archivelog destination for Oracle 10g.
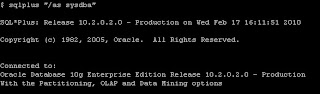
Step 1: Login to Database as SYSDBA
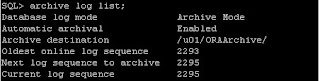
Step 2: Check the Archive Destination using archive log list command.

Step 3: Set the value of db_recovery_file_dest Parameter.

Step 4: Set the value for db_recovery_file_dest_size Parameter

Step 5: Check the new location for Archivelog destination

Step 6: Use the below command to generate Archivelog.

Step 7: Use the below command to check Archive Destination and log sequence.
I used below steps to change Archivelog destination for Oracle 10g.
Step 1: Login to Database as SYSDBA

Step 2: Check the Archive Destination using archive log list command.

Step 3: Set the value of db_recovery_file_dest Parameter.

Step 4: Set the value for db_recovery_file_dest_size Parameter

Step 5: Check the new location for Archivelog destination

Step 6: Use the below command to generate Archivelog.

Step 7: Use the below command to check Archive Destination and log sequence.

Tuesday, February 16, 2010
Change Database from NoArchivelog to Archivelog Mode
Description:
I used the below steps to change Archivelog mode.
Step 1: To check Database Mode

Step 2: Shutdown the database:

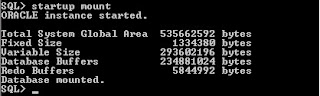
Step 3: Start the Database using mount stage
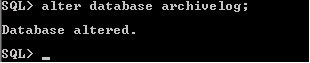
Step 4: Change the Database to archivelog mode.
Step 5: Open the Database:
Step 6: To check the Database Mode

I used the below steps to change Archivelog mode.
Step 1: To check Database Mode

Step 2: Shutdown the database:

Step 3: Start the Database using mount stage

Step 4: Change the Database to archivelog mode.

Step 5: Open the Database:

Step 6: To check the Database Mode

Monday, February 15, 2010
Script to Rebuild Indexes
Description:
Shell Script to Rebuild the Indexes
#### Script Starts Here ####
#!/bin/sh
. .profile
# Print Start Time
startTime=`date`
echo
echo "Starting Time $startTime"
rebuild1=/tmp/rebuild.tmp
sqlplus -s system/manager << ! > $rebuild1
set pagesize 0
set feedback off
SELECT 'ALTER INDEX '||owner||'.'||index_name||' REBUILD TABLESPACE '||tablespace_name||' ONLINE;'
FROM DBA_INDEXES
where owner not in ('SYSTEM','SYS');
!
sqlplus -s system/manager << !
set feedback off
set pagesize 0
set echo on
set time on
set timing on
@$rebuild1
exit
!
# Print End Time
endTime=`date`
echo
echo "Rebuild Schema Successfully Completed"
echo "Ending Time $endTime"
#### Script Ends Here ####
Tuesday, December 29, 2009
How to enable trace for a Session?
Use the below steps to trace the Sessions.
Step 1: Login as sysdba
$sqlplus “/as sysdba”
Step 2: Execute the below query to get sid and serial#
SQL> select sid, serial# FROM v$session where username = 'USER_NAME';
Step 3: Enable trace Session using the below
SQL>exec dbms_system.set_sql_trace_in_session(sid,serial#,TRUE)
e.g: SQL> exec dbms_system.set_sql_trace_in_session(100,2018,TRUE)
Step 4: Check the trace files from user_dump directory.
SQL> select value from v$parameter where name = 'user_dump_dest';
Step 5: Check the trace (.trc) files from user_dump_dest directory.
Step 6: Disable trace session using the below
SQL>exec dbms_system.set_sql_trace_in_session(sid,serial#,FALSE)
e.g: SQL> exec dbms_system.set_sql_trace_in_session(100,2018,FALSE)
Monday, December 28, 2009
Set Environment Variable for Multiple Databases
You can use the below method to Set Environment Variable for Multiple Databases.
Step 1: Edit the .profile with the following information.
########## --Script starts Here -- ###############
print
print "Available SIDs to choose from:"
cat /var/opt/oracle/oratab | grep -v ^#
print
#Set Oracle SID
export ORACLE_SID=testdb -- enter the SID which you connect very often. Only one SID is enough
TERM=vt220; export TERM
. $HOME/.All_Profile
export ORACLE_TERM=vt100;
stty erase ^h
#stty erase ^?
EDITOR=vi; export $EDITOR
set -o vi
########## --Script Ends Here -- ###############
Step 2: Create .All_Profile with the following information.
########## --Script starts Here -- ###############
ORAENV_ASK=YES
export ORAENV_ASK
#To Set ORACLE Base
export ORACLE_BASE=/export/home/oracle1
export ORACLE_HOME=$ORACLE_BASE/product/10.2.0/db_1
#Set Oracle SID
export ORACLE_SID=testdb -- enter the SID which you connect very ofte. Only one SID is enough
#Set PATH to executable directories
PATH=:$PATH:$ORACLE_HOME/bin:$ORACLE_HOME/OPatch:/usr/sbin:/usr/lib:/bin
export PATH
. oraenv
#Set PATH for LD_LIBRARY PATH
export LD_LIBRARY_PATH=$ORACLE_HOME/lib:/usr/lib
# Set Oracle user umask
umask 022
# Ensure that TWO_TASK is not set
unset TWO_TASK
# Ensure that CLASS_PATH is not set
unset CLASS_PATH
export ORACLE_PATH=$HOME
########## --Script Ends Here -- ###############
Step 3: Logout the session and Login again.
Above steps I tested in Solaris Environment.
Step 1: Edit the .profile with the following information.
########## --Script starts Here -- ###############
print "Available SIDs to choose from:"
cat /var/opt/oracle/oratab | grep -v ^#
#Set Oracle SID
export ORACLE_SID=testdb -- enter the SID which you connect very often. Only one SID is enough
TERM=vt220; export TERM
. $HOME/.All_Profile
export ORACLE_TERM=vt100;
stty erase ^h
#stty erase ^?
EDITOR=vi; export $EDITOR
set -o vi
########## --Script Ends Here -- ###############
Step 2: Create .All_Profile with the following information.
########## --Script starts Here -- ###############
ORAENV_ASK=YES
export ORAENV_ASK
#To Set ORACLE Base
export ORACLE_BASE=/export/home/oracle1
export ORACLE_HOME=$ORACLE_BASE/product/10.2.0/db_1
#Set Oracle SID
export ORACLE_SID=testdb -- enter the SID which you connect very ofte. Only one SID is enough
#Set PATH to executable directories
PATH=:$PATH:$ORACLE_HOME/bin:$ORACLE_HOME/OPatch:/usr/sbin:/usr/lib:/bin
export PATH
. oraenv
#Set PATH for LD_LIBRARY PATH
export LD_LIBRARY_PATH=$ORACLE_HOME/lib:/usr/lib
# Set Oracle user umask
umask 022
# Ensure that TWO_TASK is not set
unset TWO_TASK
# Ensure that CLASS_PATH is not set
unset CLASS_PATH
export ORACLE_PATH=$HOME
########## --Script Ends Here -- ###############
Step 3: Logout the session and Login again.
Above steps I tested in Solaris Environment.
Monday, December 14, 2009
Rebuild Database
Description:
We can use the below approaches to rebuild the entire database.
Approach #1: For Smaller Database.
Step 1: Export the whole database using export utility (exp).
Step 2: Drop the whole database.
Step 3: Create the database.
Step 4: Import the whole database using import utility (imp).
Approach #2:
Step 1: Create the additional tablespace to move all the objects to this tablespace. e.g. if all the objects exists in “USERS” tablespace, we can create “USERS1” tablespace.
Step 2: Move all the objects to newly created additional tablespace using ALTER TABLESPACE command (REBUILD option).
Step 3: Again move all the objects to original tablespace.
Approach #3:
Step 1: We can use transportable tablespace to move one database to another database (only for 10g)
Approach #4:
Step 1: Take Hotbackup (Data files and control file backup) of the existing server. Rebuild the whole database using Hotbackup files.
Approach #5:
Step 1: Take Cold backup of the existing server. Rebuild the whole database using Cold backup files.
Note1: Approach #1 will avoid row chaining and fragmentation of the table and also easiest method to rebuild the whole database.
Note2: Approach #2 we need to additional space in servers. This method also avoid row chaining and fragmentation
Tuesday, December 8, 2009
Oracle Process Manager and Notification Server (OPMN)
Description:
Oracle Process Manager and Notification Server (OPMN) is installed and configured with every Oracle Application Server installation type and is essential for running Oracle Application Server.
Command List:
To Get opmnctl Help :
$opmnctl help
To Start OPMN:
$opmnctl start
To Start OPMN and all managed processes:
$opmnctl startall
To Stop OPMN and all managed processes:
$ opmnctl stopall
To get the OPMN status:
$opmnctl status
We can use the following commands to start or stop component level
To Start component Level Service:
$opmnctl startproc ias-component=SERVICE_NAME
e.g:
$opmnctl startproc ias-component=HTTP_Server
To Stop Component Level Service:
$opmnctl stopproc ias-componenet=SERVICE_NAME
e.g:
$opmnctl stopproc ias-component=HTTP_Server
Subscribe to:
Posts (Atom)